 After paying to have your nails expertly done, you leave the salon and that’s it until your next appointment, right? Not exactly.
Maintaining your manicure (or pedicure) requires a little bit of work from you once you get home. By doing a little at-home maintenance, you can get the most out of the service that you’ve just paid for and your manicure or pedicure will continue to look fabulous for weeks!
Water is not your manicure’s friend (this applies to pedicures too) as your natural nails are made up of hard “dead” keratin cells, just like your hair. When immersed in water these dry keratin cells absorb water, which causes them to swell and expand, temporarily changing the shape of your natural nail. Once you’ve dried your hands, your nails may look dry but the keratin cells will still be retaining water and your nails may feel slightly softer than normal. It takes a while for the water to evaporate from these cells, for them to harden and for your natural nail to shrink back to its original shape.
Nail lacquer (traditional nail polish), gel polish and other nail enhancements (like acrylic, hard gel and PolyGel overlays or extensions) become hard once dried or set and are unable to flex as much as your natural nails do when they become wet. Constant expansion and contraction of your natural nail is what causes cracking and chipping in your nail polish and can also lead to lifting, especially if you have enhancements. This constant expansion and contraction can cause your natural nails to become brittle, resulting in breaks or frequent tears and is one of the reasons why I do not provide “wet” manicure or pedicure services. Applying gel polish or enhancements to a swollen, damp nail plate will only result in lifting or chipping once the natural nail dries out and your manicure or pedicure won’t last very long.
You can help maintain and prolong the look of your salon manicure or pedicure at home by doing a few simple things: Avoid sunbeds, saunas, spa pools or swimming for 48 hours after your appointment. Wear gloves whenever you have to submerge your hands in water for long periods of time (like washing dishes, cleaning, etc.). Wear gloves when using chemical products or gardening. If you like to soak in a bath, try to keep your hands (and toes) above the water while you lie there and relax.
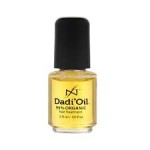
 Use Cuticle Oil daily, preferably morning and night. Cuticle Oil helps to keep the skin around your nails, your cuticles and your nail bed hydrated, nourished and flexible, which in turn promotes a healthy natural nail underneath your nail polish or enhancement. It also helps to keep your gel polish from becoming brittle and chipping. I do stock Dadi’Oil by Famous Names, which is a great cuticle oil to use daily, and you’re welcome to purchase a bottle when you come in for your next manicure appointment, or get one in our online store. If you already have a 3.75ml bottle and you do run out, bring the bottle with to your manicure appointment, and I can refill it at a discounted price.
If one of your nails happens to break, file it into a symmetrical shape as soon as possible to prevent further damage or tearing. This may mean that you have one nail that is shorter than the others, but rather a short nail than than catching it on something and having it tear further or even risk doing permanent damage to your nail bed, especially if the tear is low.
Filing any rough edges or torn nails should not damage your gel polish or enhancements, but it will break the seal on the free edge and your polish may begin lifting. If your polish or enhancements do begin to lift or peel, please make an appointment to see me as soon as possible, even if its for a single nail repair. Please don’t be tempted to pick at or peel off the polish or enhancements, as this will damage your natural nails. It is possible for you to pull off layers of your natural nail along with the polish or enhancement and this can result in irreversible damage to your natural nails, leaving them paper-thin and soft.
Always treat your nails with care. Use the handle of a teaspoon to lift and open pull-tab cans, use the side of your hand or your fingertips (not your nails) to open cupboard doors or the fridge and never remove staples from paper with your nails. Be conscious of your hands and nails, especially if you have enhancements, as your nails will be longer than you’re used to and it may take you a few days to adjust. Try not to repeatedly tap or drum your enhancements on hard surfaces, as much as you may like the sound, the little vibrations created by doing this will cause your enhancements to start separating and lifting, this may also lead to long-term damage of your natural nails.
If you’ve chosen a pale colour for your manicure, apply a traditional clear top coat over your gel manicure as soon as you get home. This will prevent your polish from being stained by food, make-up, hair dye or clothing dyes. The traditional top coat may become stained but can simply be wiped off with nail polish remover and reapplied whenever necessary, without affecting your gel manicure or enhancements underneath. This simple step will definitely help keep your manicure looking pretty for longer!
 I always recommend having your gel polish removed by a professional, but if for some reason you are unable to make an appointment to see me and can’t get to a professional salon, then this can be done safely at home by following these steps:
You will need a nail file, cuticle oil, nail polish remover, cotton wool, foil wraps (squares of tinfoil) and an orangewood cuticle stick. I do sell gel polish removal packs that contain a nail file and buffer, cuticle stick, 10 professional foil wraps and a small pot of hand lotion. If you’d like one of these packs, kindly ask at your next appointment or purchase one from the online store. If you’ve already purchased a removal pack and still have the nail file, buffing block and wooden cuticle stick, I can sell you the foil removal wraps without you needing to purchase an entire removal kit.
1. Lightly etch (file) the surface of the gel polish with the nail file, so that the top coat loses some of its shine.
2. Apply cuticle oil to the skin around your nails, try to avoid getting it on your nails. The cuticle oil will prevent the nail polish remover from drying out your skin too much. If you don’t have cuticle oil, apply some of the hand cream.
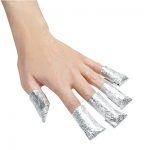
3. Apply nail polish remover to the pad on the foil square. Place the pad over the nail and wrap the foil securely around your finger, folding the top over onto the top of your nail. Squeeze the wrap in place so that it’s a snug fit.
4. Repeat step 3 and wrap the remaining nails.
5. Leave these foil caps on for 10 minutes to dissolve the gel polish bonds.
6. If it’s cold, sit on your hands or place them under one of those microwavable heat packs or wheaty bag, as this will help loosen the polish bonds.
7. Starting with the finger that you first applied nail polish remover to, carefully slide the foil cap off, being careful not to squash it. Gently scrape off the peeling gel polish using the orangewood cuticle stick. If the polish doesn’t come off easily, replace the foil cap that you’ve just removed and move onto the next finger. Don’t force any stubborn polish off, as you may damage your nail.
8. Repeat with remaining fingers, removing and replacing the foil caps as needed, until all the polish has been soaked off and gently removed.
9. Use the buffing block to remove any last traces of colour, starting with side 2, then side 3 and finally side 4, to buff your nails to a nice shine. Finish by applying hand cream and massage it into the hands, cuticles and nails.
If you absolutely cannot get to a salon for a professional to remove your acrylic enhancements, this same method can be used, although it will need to be soaked for longer (around 20 minutes). If the acrylic doesn’t gently flake off, replace the foil ‘cap’ and soak it for a little longer. Don’t force any acrylic off, as you will damage your natural nails by tearing off layers of the nail along with the product you’re trying to remove. This kind of damage can leave your nails paper-thin and soft, or if it’s really stuck, even tear off whole portions of the nail plate and doing permanent damage to your natural nail. Wherever possible, always get a professional to remove your gel polish, and acrylic or hard gel enhancements.
Please note that PolyGel and Hard Gel overlays and extensions are done with non-soak off products and cannot be removed using the method above for gel polish. Polygel and Hard Gel overlays or enhancements do need to be carefully removed by a professional.


Leave a Reply
You must be logged in to post a comment.