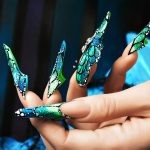
 Have you ever noticed some of the more “exotic” nail shapes out there, while watching TV or paging through a magazine? This article explains the difference between the nail shapes and whether or not they’re suitable for natural nails or can only be done using acrylic or hard gel extensions.
The first four nail shapes (square, squoval, oval and round) can be done on natural nails. Oval and round nails are strong, sturdy and easy to maintain. The more adventurous nail shapes can only be done on Hard LED Gel, PolyGel or Acrylic extensions. They’re higher-maintenance, are difficult to maintain by yourself (you’ll need a nail technician), are more prone to breakages and it can be difficult to change the shape of them as they grow out.
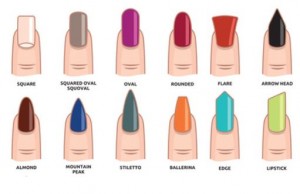
Square: The square nail has a flat top that meets two flat sides. The edges of the nail can be rounded off ever so slightly to prevent the corners of the nail from snagging stockings and tights.
Squoval (Square Oval): This nail shape isn’t as round as an oval and isn’t as straight as a square. It still has a partially square look but with much softer corners. The Squoval is a universally flattering nail shape.
Oval: The oval nail shape is curved at the top, creating a perfectly oval shape for the entire nail. This nail shape looks great on long nails, it helps to elongate your fingers and is one of the strongest nail shapes.
Round: The sides of the round nail are curved and meet at a rounded point, it’s much more curved than the oval shape. Round nails can help short fingers look more elongated and slender. Round nails are one of the strongest nail shapes.
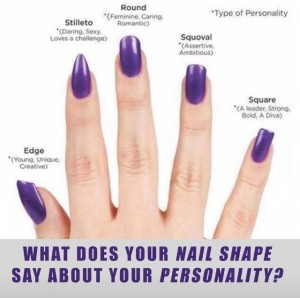
Arrow Head: This shape is similar to the Mountain Peak but has a sharp “v”-shaped point. It’s probably closer to the Edge in shape but shorter and doesn’t have the raised ridge running up the middle of the nail. This is quite a weak nail shape and is not recommended for natural nails.
Almond: An Almond nail curves from a smooth, rounded shape at the base of the nail to a tapered point, just like the shape of an Almond nut. This dramatic nail shape requires a little more maintenance and it’s not as strong as Round or Oval. If your natural nails are prone to breaking easily, avoid this shape or consider having a Hard LED Gel, PolyGel or an Acrylic overlay done first.
Mountain Peak: Unusual and daring, this nail shape is more sharply pointed than the Almond. As the sides of the nails are filed into a point, this shape will weaken natural nails and it’s preferable to have this shape done with either enhancements or an overlay.
Stiletto: This is a more extreme version of the Almond shape. Its longer, more pointed and is not suitable for natural nails as the natural nail doesn’t have the strength to hold this shape and can only be achieved with Hard LED Gel or PolyGel enhancements or acrylic enhancements. This nail shape is a bit on the impractical side as it will make day-to-day activities much more challenging, as well as being prone to breakages, purely because it’s so long and you may knock or bump it more than you would an active nail length.
Ballerina or Coffin: Similar to the Almond or Stiletto shape (depending on how long you want the nail extended) but with the pointed tip filed flat. It looks very much like a ballet pointe shoe.
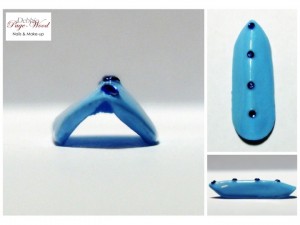 Edge: Edge nails are funky and unconventional. The shape is a defined inverted “V” with parallel edges, flat sides and a raised ridge that runs along the top of the nail that softly blends into a rounded section near the cuticle. Edge nails can only be created with acrylic or PolyGel nail enhancements.
Lipstick: This lop-sided, impractical, funky nail shape is also known as “oblique” and is best kept for a special event. For obvious reasons, it’s not suitable for those who wear contact lenses.
If you’re wanting to get your nails done using one of these longer-length, more “exotic” nails shapes, expect to pay more than a normal nail extension and be prepared for it to take longer, as sculpting the extra length and unusual nail shapes takes time.
And then there are two nail shapes that I simply flat out refuse to do: the Flared nail and the Bubble nail. I worked my butt off during my nail tech training to learn how NOT to sculpt nails like these. These two nail shapes simply go against everything that I was taught as a Nail Technician. Even though there may be people out there who genuinely want these, I simply will not allow anyone to walk out of my salon with something as hideous as these.
Flared: Flared or “Duck Feet” nails are created with acrylic where the tip of the nail is extended and flared outwards to create a nail tip that is wider than the natural nail would be. This goes against everything I was taught about perfectly parallel sidewalls, gentle tapers, C-curves and technically perfect nail structures! I’ve only ever done flared nails on two occasions and they were purely by accident and happened during day 1 and day 2 of my acrylic nail training. I’d never worked with acrylic before and it was a huge learning curve for me. Even then, they were nowhere near as flared as this nail shape is made to be!
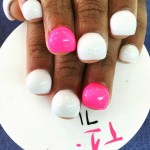 Bubble: I’m sorry, but this is downright ridiculous and, once again, goes against everything I spent hours and weeks practicing when I was learning to do acrylic nail enhancements. Bubble nails or “hump nails” are created with acrylic, starting with a ball in the middle of the nail and then built up to create a thickened, raised hump. There’s no perfect apex, no C-curve and definitely no perfect nail structure.


Leave a Reply
You must be logged in to post a comment.